
This spring, I have been on a recycling kick and I have discovered how fun it is to repurpose glass! Then when I came across this Wine Bottle Tiki Torch tutorial posted on Pinterest via the fabulous Design Sponge and I knew I had to give it a try. From the tutorial, here is a list of gear you will need:
1. Empty Wine Bottle (You can use any bottle you like as long as it’s glass and the neck is 1” in diameter.)
2. Teflon Tape 1/2”
3. Copper Top Plate Connector (threaded for 3/8”-16 thread rod)
4. 1” Split Ring Hanger (threaded for 3/8”-16 thread rod)
5. 1/2” x 3/8” Copper Coupling
6. 1/2” Copper Cap
7. Two Hex Nuts (threaded for 3/8”-16 thread rod)
8. Two #10 x 1” Zinc Plated Wood Screws (if your mounting it to wood)
9. 3/8”-16 Zinc Plated Threaded Rod (I bought a 3’ rod and cut it down to 8, 4-1/2” rods with a hacksaw.)
10. Tiki Replacement Wick
11. Torch Fuel (For safety reasons, only use fuel made specifically for outdoor torches. i.e. Tiki brand)
Other things that proved helpful: Goo Gone adhesive remover, oil, hacksaw, Dremel, power drill, wrench, gloves, protective eye-wear.
Aside from all the hardware that is needed, one does have to start with nicely shaped bottles. I dragged a few bottles in similar sizes/shapes from the recycling bin and well yes, I admit it, I bought a few bottles just for the color (I had to have the blue!). Once I had my bottles, I filled a sink with soapy water, cleaned out the bottles and began to soak off the labels. Off to the hardware store!
I started my search at Ace Hardware, well because Ace usually has EVERYTHING…well at least they usually do. Unfortunately, this time they let me down. Then I tried a couple other stores and eventually found what I needed in the plumbing department at Lowes. The “Copper Top Plate Connector” turned out to be a “ceiling flange” and I couldn’t find them in copper, so I compensated by picking up a can of copper metallic spray paint. Once I found all the components, I spray painted my flanges (which turned out fab!) and while they dried, I began to assemble the rest of my torches.
Looking at my list of instructions, I figured the most labor intensive portion was going to be cutting the threaded rod into 4.5″ pieces. I dragged out my trusty hacksaw and found a place where I could kneel on the rod to hold it in place while I “hacked” my rod into segments. Thirty minutes and much grunting, snorting and cussing later…*ta-da!*…I had cut off one. Hmph! THAT’S not going to work. I have six to cut. Plan B. I remembered that the Dremel I bought my husband for Christmas had a metal cutting disc on it and dragged it out of the box. After a quick how-to on Youtube, I figure out how to put it together, placing the correct disc on top and we were in business! (Note: you want to be sure to wear protective eye-wear, long sleeves and gloves as sparks will fly when cutting the rod…*cue Flashdance theme*). The Dremel cut the remaining rod in short order and I was ready to begin my assembly.
I checked on my bottles and I found I had to help work the labels off. Some had to be scraped and then re-soaked. Some just slid off. Once the labels were off, I used Goo Gone to remove the sticky residue. Also, you can try oil to remove the stick. Washing them one more time to ensure all residue was removed, I turned them upside down on a paper towel on the counter to drain of remaining water.
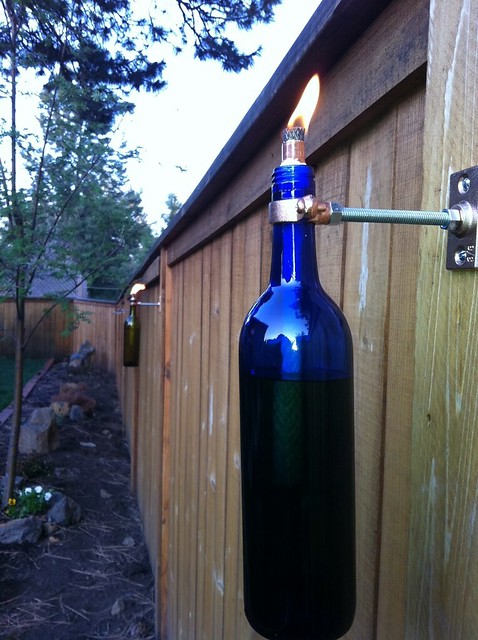
My biggest fear was that once I cut the rod, the threads would no longer function to go into the plate as well as the split ring hanger. Thankfully, all the threads worked perfectly. Next, I took the painted ceiling flanges and took them to where I wanted them on my fence posts. I measured the same distance down from the top of the fence for all posts and with a pencil, marked where I wanted the pilot holes to be drilled. Once, the holes were drilled, I was able to screw in the ceiling flanges to the fence posts. From there, I screwed on hex nuts on both ends of the threaded rod and screwed them into the ceiling flange on the fence. I tightened the nuts closest to the fence with a wrench so that they fit securely. Next, I added the split ring hanger to the other side of the threaded rod, tightening the other nut so that the hanger was secure on the outside. At this point, I loosened my hangers in order to make inserting the wine bottles easier.
Next, I began wrapping the 1/2 inch side of the copper coupling with the teflon wrap as smoothly as possible so that it fit snugly inside the wine bottle neck. I inserted the tiki torch replacement wick and played with the snugness of the teflon coated coupling within the top of the bottle. The last thing I wanted was for the coupling to fall in! Once I was certain they were secure, I took an old funnel and added the tike torch fuel and finally positioned the tiki torch insert. HINT: One thing I have learned since doing this project is that oil floats on water. I knew this from grade school science class but didn’t realize you could add water to the bottom of the bottle and allow the oil to float to the top, thus requiring less oil to fill your torches. This also makes the torches much safer. UPDATE: if you do add water to your bottles, you must take down your bottles in winter. The water will freeze and your bottles will break. I learned this the hard way. *sniff*
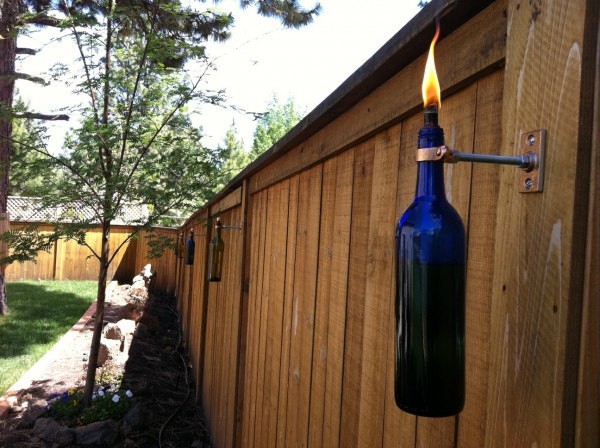
At this point, I am getting very excited to see the finished product. I take my new torches and begin to screw them into the hanger. I have seen other tutorials suggest adding a padded adhesive (like that which you use to winterize doors) inside the hanger and I can see why. It would be easy to screw in the hanger too tightly around the bottle and break it. I carefully tighten the hanger and add the copper tops to keep the wicks dry when not in use.
Voila! I am very happy with the results and here is what they look like lit up at night!
I have a few other projects I will be adding where I have recycled glass. Do you have a project for which you have upcycled glass? I would love to hear from you!
No Responses to “Recycled Wine Bottle Tiki Torch Tutorial”